INTEL WIRELESS
Wired Stuff
WiFi Tablet Corner
My80211 White Papers (Coming Soon!)

Cisco Wireless Compatibility Matrix (Nov. 2011)

Podcasts / Videos

My80211 Videos

Cisco: 802 11 frames with Cisco VIP George Stefanick

Fluke Networks: Minimize Wi Fi Network Downtime

Aruba: Packets never lie: An in-depth overview of 802.11 frames

ATM15 Ten Talk “Wifi drivers and devices”

Houston Methodist Innovates with Wireless Technology

Bruce Frederick Antennas (1/2)


Bruce Frederick dB,dBi,dBd (2/2)

Cisco AP Group Nugget

Social Links
Revolution WiFi Capacity Planner

Anchor / Office Extends Ports


Peek Inside Cisco's Gear

See inside Cisco's latest wireless gear!

2.4 GHz Channel Overlap

EXAMPLE 1  

EXAMPLE 2

EXAMPLE 3  

CWSP RELEASE DATE 2/08/2010
  • CWSP Certified Wireless Security Professional Official Study Guide: Exam PW0-204
    CWSP Certified Wireless Security Professional Official Study Guide: Exam PW0-204
    by David D. Coleman, David A. Westcott, Bryan E. Harkins, Shawn M. Jackman

    Shawn Jackman (Jack) CWNE#54 is a personal friend and has been a mentor to me for many years.  I've had the pleasure and opportunity to work with Jack for 4 years. Jack is a great teacher who takes complex 802.11 standards and breaks them down so almost anyone can understand the concept at hand. I'm excited for you brother. Great job and job well done! Put another notch in the belt!

IEEE 802.11a/g/n Reference Sheet


LWAPP QoS Packet Tagging


Interference Types

BLUETOOTH
 

Microwave Oven
 

Cordless Phone

JAMMER!
 

Tuesday
Feb092010

WLC - Did you know the Cisco WiSM doesn't support CDP!?


Did you know that the Cisco WiSM doesnt support CDP (Cisco Discovery Protocol)? Odd, isn't, but it doesn't.

CDP is not supported on the controllers that are integrated into Cisco switches and routers, including those in the Catalyst 3750G Integrated Wireless LAN Controller Switch, the Cisco WiSM, and the Cisco 28/37/38xx Series Integrated Services Router. However, you can use the show ap cdp neighbors detail {Cisco_AP | all} command on these controllers in order to see the list of CDP neighbors for the access points that are connected to the controller. - (Cisco 6.0 Config Guide)

What this means is that if you do a CDP on the CAT that houses the WiSM you won't see the WISMs as
a neighbor. Here is an example of a CAT with WiSMs and the CDP command is entered: 

6509#show cdp neighbors

Device ID        Local Intrfce     Holdtme    Capability  Platform  Port ID

6509LAB1

                 Gig 1/1            166         R S I     6504LAB  Gig 1/1

6509LAB2

                 Gig 1/2            150         R S I     6504LAB  Gig 1/2  


How you can see the WiSMs is with the show module command. See below:

6509#show module

Mod Ports Card Type                              Model              Serial No.

--- ----- -------------------------------------- ------------------ -----------

  1    2  Supervisor Engine 720 (Active)         WS-SUP720-3B        XXXXXXXXXX

  2   16  SFM-capable 16 port 10/100/1000mb RJ45 WS-X6516-GE-TX     XXXXXXXXXX

  3   10  WiSM WLAN Service Module               WS-SVC-WISM-1-K9             XXXXXXXX

  4   10  WiSM WLAN Service Module               WS-SVC-WISM-1-K9             XXXXXXXX


Wednesday
Jan272010

WLC - Configure Administrator User Names and Passwords in CLI


How to add / delete /change a user in the WLC via the CLI and apply your permissions.


To add a new user with READ or READ/WRITE permissions. First drop into the CLI of the WLC. Next, lead with the following:

CONFIG MGMTUSER  <ADD> <USERNAME> <PASSWORD> <READ-WRITE or READ-ONLY>

You have other options such as delete, description, and password.

(Cisco-2006) >config mgmtuser ?

add            Creates a local management user.
delete         Delete an existing management user.
description    Sets the description for a management user.
password       Configures a password for a management user.


When you add a user you have 3 permissions:

(Cisco-2006) config>mgmtuser add username password ?

read-write      Creates a management user with read-write access.
read-only        Creates a management user with read-only access.
lobby-admin    Creates a management user with lobby ambassador priviledges.


If you need to change the password of an existing user lead with the following:

CONFIG MGMTUSER  <PASSWORD> <USERNAME><PASSWORD>


To display your existing users use the show mgmtuser command:


(Cisco-2006) >show mgmtuser
User Name                 Permissions    Description
-----------------------   ------------   --------------------------------
cisco                     read-write
george                  read-write
lobby                    lobby-admin


NOTE -- User Names and Passwords are CASE SENSITIVE


Friday
Jan222010

WLC How to enable webmode (HTTP) or secureweb (HTTPS)


Enabling / Disabling HTTP or HTTPS on a Cisco WLC is simple. Keep in mind, if you enable/disable HTTPS you need to do a WLC reboot (ouch for you change control folks!). 

Enable HTTP 
(Cisco-2006) >config network webmode enable

DISABLE HTTP
(Cisco-2006) >config network webmode disable

ENABLE HTTPS
(Cisco-2006) >config network secureweb enable
You must reboot for the change to take effect.

DISABLE HTTPS
(Cisco-2006) >config network secureweb disable
You must reboot for the change to take effect.


SHOW WEB MODE STATUS
(Cisco-2006) >show network summary
RF-Network Name............................. test
Web Mode.................................... Enable
Secure Web Mode............................. Enable
Secure Web Mode Cipher-Option High.......... Disable
Secure Web Mode Cipher-Option SSLv2......... Enable
Secure Shell (ssh).......................... Enable
Telnet...................................... Enable
Ethernet Multicast Mode..................... Disable   Mode: Mcast  0.0.0.0
Ethernet Broadcast Mode..................... Disable
IGMP snooping............................... Disabled
IGMP timeout................................ 60 seconds
User Idle Timeout........................... 300 seconds
ARP Idle Timeout............................ 300 seconds
ARP Unicast Mode............................ Disabled
Cisco AP Default Master..................... Disable
Mgmt Via Wireless Interface................. Enable

WLC How to enable webmode (HTTP) or secureweb (HTTPS)

Thursday
Jan212010

WLC Change Command Prompt


You may already be very familiar with changing the host / prompt name of a Cisco Router or Switch. Config T --> hostname --> abc123


The CLI command in Airespace OS to change the command prompt is ---  Config --> Prompt --> abc123
Example –
(WiSM-slot3-1) >config prompt ?|
<prompt>       Enter system prompt up to 64 case sensitive characters

 
** NOTE ** My WLC is running 6.0.188.0  -- If you “config prompt ?” states “
<prompt>       Enter system prompt up to 64 case sensitive characters.”

HOWEVER if you read the 6.0 Config Guide, page 2-24 states –“ The system prompt can be any alphanumeric string up to 31 characters. You can change it by entering the config prompt command.”

Personally, I don’t think I ever had a switch/router name more then 15 or 18 characters. 

I tested it and you can go up to 64 !
(1111111111111111111111111111111111111111111111111111111111111111) >config prompt 1111111111111111111111111111111111111111111111111111111111111111a
Input is too long!
(1111111111111111111111111111111111111111111111111111111111111111) >config prompt 1111111111111111111111111111111111111111111111111111111111111111


Saturday
Jan022010

WLC Disable Wireless Client (CLIENT EXCLUSION)

There can be countless reasons why you may want to block a wireless client from accessing the WLAN. One real world scenario happened a few months back where I was contacted by a customer who's enterprise was just hit with a virus. As they quarantined and identified infected hosts they could not account for 50+ wireless clients, which were infected and online.

As they cleaned infected machines, these machines became infected again due to these 50+ devices. They needed a way to disable them from the WLAN,  but didn't have time to locate the 50+ nor did they know their exact location.Here is how to disable clients blocking access to the WLAN.

NOTE: WHEN A CLIENT IS ON THE EXCLUSION LIST, THE WLC IGNORES PROBE REQUEST FROM THE CLIENT. SEE DEBUG BELOW


CONFIG CLIENT EXCLUSION

(Cisco Controller) >config exclusionlist ?              
add               Creates a local exclusion-list entry
delete           Deletes a local exclusion-list entry
description    Sets the description for an exclusion-list entry

(Cisco Controller) >config exclusionlist add 00:25:d3:8b:00:13

REMOVE CLIENT EXCLUSION (ALLOWS CLIENT ACCESS TO WLAN)

(Cisco Controller) >config exclusionlist delete 00:25:d3:8b:00:13

DEBUG CLIENT WHILE EXCLUDED

NOTE: THE WLC IS IGNORING THE CLIENTS PROBE REQUEST


(Cisco Controller) debug>client 00:25:d3:8b:00:13
Fri Jan  1 17:57:04 2010: 00:25:d3:8b:00:13 Ignoring probe request due to exclusion-listing of the mobile
Fri Jan  1 17:57:08 2010: 00:25:d3:8b:00:13 Ignoring probe request due to exclusion-listing of the mobile
Fri Jan  1 17:57:09 2010: 00:25:d3:8b:00:13 Ignoring probe request due to exclusion-listing of the mobile
Fri Jan  1 17:57:12 2010: 00:25:d3:8b:00:13 Ignoring probe request due to exclusion-listing of the mobile
Fri Jan  1 17:57:13 2010: 00:25:d3:8b:00:13 Ignoring probe request due to exclusion-listing of the mobile
Fri Jan  1 17:57:17 2010: 00:25:d3:8b:00:13 Ignoring probe request due to exclusion-listing of the mobile
Fri Jan  1 17:57:21 2010: 00:25:d3:8b:00:13 Ignoring probe request due to exclusion-listing of the mobile
Fri Jan  1 17:57:22 2010: 00:25:d3:8b:00:13 Ignoring probe request due to exclusion-listing of the mobile
Fri Jan  1 17:57:25 2010: 00:25:d3:8b:00:13 Ignoring probe request due to exclusion-listing of the mobile
Fri Jan  1 17:57:26 2010: 00:25:d3:8b:00:13 Ignoring probe request due to exclusion-listing of the mobile
Fri Jan  1 17:57:27 2010: 00:25:d3:8b:00:13 Ignoring probe request due to exclusion-listing of the mobile
Fri Jan  1 17:57:29 2010: 00:25:d3:8b:00:13 Ignoring probe request due to exclusion-listing of the mobile
Fri Jan  1 17:57:29 2010: 00:25:d3:8b:00:13 Association request(2): Exclusion-listed!!

Wednesday
Dec302009

WLC "DHCP Address Assignment Required" Option 

DHCP address assignment required is one of those check boxes that make you go huh, while you scratch your head, if you don't know how it works. Cisco's best pratice for voice is to disable this feature. However, keep in mind,  if DHCP Addr. Assignment Required is selected, clients must obtain an IP address via DHCP. Any client with a static IP address is not allowed on the network.


The DHCP Required option in WLAN settings allows you to force clients to do a DHCP address
request/renew every time they associate to the WLAN before they are allowed to send or receive other
traffic to the network.
 
From a security standpoint, this allows for a more strict control of IP addresses
in use, but also might have affects in the total time for roaming before traffic is allowed to pass again.
 
Additionally, this might affect some client implementations which do not do a DHCP renew until the
lease time expires. For example, Cisco 7920,7921 and 7925 phones might have voice problems while they roam if this option is enabled, as the controller does not allow voice or signaling traffic to pass until
the DHCP phase is completed.
 
Some third−party printer servers might also be affected. In general, it is a good idea not to use this option if the WLAN has non−Windows clients. This is because the more strict controls might induce connectivity issues, based on how the DHCP client side is implemented.
 
Additional Notes: The WLAN advance configuration has an option to require that a user must pass DHCP before going into the RUN state (a state where the client will be able to pass traffic through the controller). This option requires the client to do a full or half DHCP request. The main thing the controller is looking from the client is a DHCP request and a ACK coming back from the DHCP server. As long as the client does these steps, the client will pass the DHCP required step and move to the RUN state.

L2 and L3 Roaming

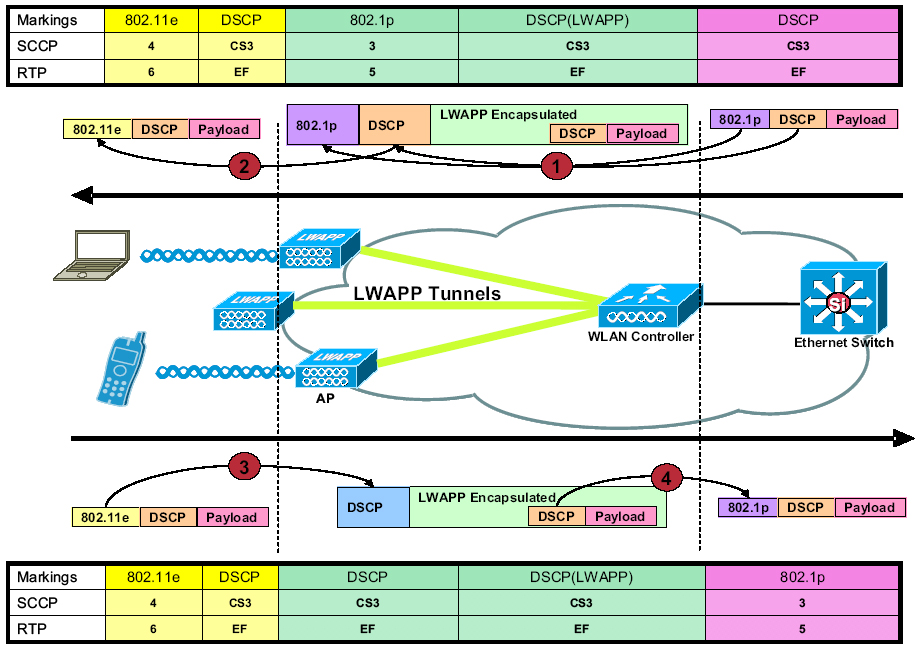
L2 - Roam—If the client has a valid DHCP lease and performs a L2 roam between two different controllers on the same L2 network, the client should not need to re-dhcp and the client entry should be completely moved to the new controller from the original controller. Then if the client does need to DHCP again, the DHCP bridging or proxy process on the current controller would transparently bridge the packet again.

L3 – Roam—In a L3 roam scenario the client is moving between 2 different controllers in different L3 networks. In this situation the client is anchored to the original controller and listed in the client table on the new foreign controller. During the anchoring scenario the client’s DHCP is handled by the anchor controller as the client data is tunneled within an EoIP tunnel between the foreign and anchor controllers.

 
SHOW WLAN <WLAN ID>
To confirm the current config, this option lives under the show wlan <WLAN ID>
 
(Cisco Controller) >show wlan 1
WLAN Identifier.................................. 1
Profile Name..................................... TEST
Network Name (SSID).............................. TEST
Status........................................... Enabled
MAC Filtering.................................... Disabled
Broadcast SSID................................... Enabled
AAA Policy Override.............................. Disabled
Number of Active Clients......................... 6
Exclusionlist.................................... Disabled
Session Timeout.................................. 1800 seconds
Interface........................................ management
WLAN ACL......................................... unconfigured
DHCP Server...................................... Default
DHCP Address Assignment Required................. Disabled
Quality of Service............................... Silver (best effort)
WMM.............................................. Disabled
CCX - AironetIe Support.......................... Enabled
CCX - Gratuitous ProbeResponse (GPR)............. Disabled
CCX - Diagnostics Channel Capability............. Disabled
Dot11-Phone Mode (7920).......................... Disabled
Wired Protocol................................... None
IPv6 Support..................................... Disabled
Peer-to-Peer Blocking Action..................... Disabled
Radio Policy..................................... All
<omitted>
 
CONFIG DHCP Address Assignment Required
Hummm... For the life of me I can not find the CLI command for this config. I will post it shortly, but here is the GUI command.
 
WLANs-->(click on SSID)--> ADVANCE TAB--> Check box DHCP Addr. Assignment Required
Tuesday
Dec292009

Configure TKIP Countermeasure Holdoff Timer on WLC

After having worked on countless Cisco WLAN VoIP deployments a general rule of thumb from Cisco TAC is to disable TKIP countermeasure on ALL voice WLANs and lessen the timer for DATA WLANs. Again this is all subject to your comfort level and performance requirements. Personally, I can't say I have ever seen this to be an issue or had an issue that was directly related to the countermeasure. But something to chew on!

TKIP countermeasure mode can occur if the Access Point receives 2 message integrity check (MIC) errors within a 60 second period. When this occurs, the Access Point will de-authenticate ALL TKIP clients associated to that 802.11 radio and holdoff any clients for the countermeasure holdoff time (default = 60 seconds).


(Cisco Controller)config wlan security <tkip> hold-down <seconds> <wlan id>

Note:  Configures TKIP MIC countermeasures hold-down timer (0-60 seconds)


The following command disables TKIP countermeasure on WLAN 1 

(Cisco Controller) >config wlan security tkip hold-down 0 1


Sunday
Dec272009

WLC Paging Disabled - "Similar to - term length 0" 

We've all been there... You need to drop the show-run command and you get the "Press Enter to continue Or <Ctl Z> to abort" or "--More-- or (q)uit". All you want is to drop the entire config. Wells here is how.

If you are fimilar with Cisco IOS routers and switches then you may have used the "term length 0"command. This eliminates the the page breaks. Under the WLC "Airespace OS" the equivalent is the "config paging disabled" 

(Cisco Controller) >config paging ?

enable         enable paging

disable        disable paging 


DISABLE CONFIG PAGING

The following command will allow the entire show command drop in one piece:

(Cisco Controller) >config paging disable


ENABLE CONFIG PAGING

The following command will allow paging:

(Cisco Controller) >config paging enable

Sunday
Dec272009

Recover your WLC password

So you forgot your WLC password, eh? WLC version 5.1 and later, you can use the CLI from the controller's serial console in order to configure a new user name and password. Complete these steps in order to configure a new user name and password.

       1. After the controller boots up, enter Restore-Password at the user prompt.
       Note: For security reasons, the text that you enter does not appear on the controller       console.

       2. At the Enter User Name prompt, enter a new user name.

       3. At the Enter Password prompt, enter a new password.

       4. At the Re-enter Password prompt, re-enter the new password.
       note: The controller validates and stores your entries in the database.

       5. When the User prompt reappears, enter your new username.

       6. When the Password prompt appears, enter your new password.
 

Note: For WLCs that run earlier versions of firmware (prior to 5.1), there is no way to recover the password.

If you use the Cisco Wireless Control System (WCS) in order to manage the WLC, wireless LAN controller Module (WLCM) or Wireless Services Module (WiSM), you should be able to access the WLC from the WCS and create a new administrative user without logging into the WLC itself.

Or, if you did not save the configuration on the WLC after you deleted the user, then a reboot (power cycling) of the WLC should bring it back up with the deleted user still in the system. If you do not have the default admin account or another user account with which you can log in, your only option is to default the WLC to factory settings and reconfigure it from scratch.


Sunday
Dec272009

Configure Local MAC Authentication on Cisco WLCs 

Mac filtering was popular back when WEP was the only means of wireless security. Mac filtering added an additional layer of authentication by validating the wireless NIC mac address prior to authenticating to a wireless network. Although, mac filtering is still used today, it is a management burden for larger deployments and it is very easy for a hacker to spoof the mac address with a sniffer since the mac is sent in the clear.

What you need know about local authentication on the Cisco WLC. By default, the WLC local database supports 512 entries and can be configured up to a total of 2048 max entries. This is a hard limitation and can not be exceeded unless you use a Radius server for MAC authentication.

LOCAL WLC DATABASE

The local user database is limited to a maximum of 2048 entries and is set to a default value of 512 entries. 

The local database stores entries for these items:
•MAC filters (clients)
•AP MIC/SSC (AP authorization list)
•Dynamic Interfaces
•Management users
•Local net users
•Excluded Clients
 
Together, ALL of these types of entries CANNOT exceed the configured database size.
In order to increase the local database to 2048, use this command from the CLI:
  
(Cisco Controller)Config database size ?
<count>        Enter the maximum number of entries (512-2048)
 
SHOW DATABASE SUMMARY 
 
This command will display the size of the database and current number of entries. 
 
(Cisco Controller) >show database summary
 
Current Max database entries..................... 512 <--- Default database size
Max database entries on next reboot.............. 512
Current number of entries used................... 5 <--- This is 3 user accounts and 2 dynamic interfaces
 
CONFIG MACFILTER IN LOCAL WLC DATABASE
 
The macfilter and WLAN ID are requirements
config <macfilter> <WLAN ID> [interface_name] [description] [IP address] 
 
These commands are optional and are not a requirement
[interface_name] [description] [IP address] 
 
(Cisco Controller) >config macfilter add 00:21:6A:11:A8:AA 2
 
 
ENABLE MACFILTERING ON WLAN
 
(Cisco Controller) >config wlan mac-filtering enable  2
 
SHOW MACFILTER SUMMARY
 
(Cisco Controller) >show macfilter summary
 
MAC Filter RADIUS Compatibility mode............. Cisco ACS
MAC Filter Delimiter............................. None
Local Mac Filter Table
MAC Address               WLAN Id          IP Addr           Description
-----------------------   --------------   ---------------   --------------------------------
00:21:6a:11:a8:aa           2              unknown
 
 
SHOW MACFILTER DETAIL 

(Cisco Controller) >show macfilter detail 00:21:6a:11:a8:aa
 
MAC Address...................................... 00:21:6a:11:a8:aa
WLAN Identifier.................................. 2
Interface Name...................................
IP Address....................................... unknown
Description......................................
 
MAP MAC ADDRESS TO IP ADDRESS

The config macfilter ip-address command lets you map an existing MAC-filter to an IP address. Use this command in order to configure an IP address into the local MAC filter database:
 
Config <macfilter> <WLAN ID> [interface_name] [description] [IP address] 
(Cisco Controller) >config macfilter add 00:21:6A:11:A8:AA 2 interface "description" 192.168.1.10
 
Note: <description>  Enter optional description (up to 32 characters) within double quotes


Wednesday
Dec232009

CISCO VOIP BEST PRACTICE - WLC IEEE 802.1X Timeout for EAP-FAST

When using EAP-FAST you want to insure you give the client enough time to obtain the PAC. By default the WLC is set to only 2 seconds. However I noticed with code 6.0.188.0 it is set to 30 seconds by default. This command can only be configed from the CLI of the WLC.

When using EAP-FAST, the IEEE 802.1X timeout on the controller must be increased (default = 2 seconds) in order for the client to obtain the PAC via automatic provisioning. The default timeout on the Cisco ACS server is 20 seconds, which is the recommended value.
To change the IEEE 802.1X timeout on the Cisco Wireless LAN controller, connect using Telnet or SSH to the controller and enter the following command:
(Cisco Controller)> config advanced eap request-timeout 20

(Cisco Controller)> show advanced eap

EAP-Identity-Request Timeout (seconds)........... 1
EAP-Identity-Request Max Retries................ 20
EAP Key-Index for Dynamic WEP.................... 0
EAP-Request Timeout (seconds)................... 20
EAP-Request Max Retries.......................... 2


Tuesday
Dec222009

Configure NTP / MANUAL Time on WLC

Did you know if you don’t set the time on a WLC it is very likely your access points won't join your WLC. Why do you ask!?  LWAPP/CAPWAP access points contain certificates. If your controller's time is set outside of the access points certificate validity they wont join the WLC.

You can check your access points certificate validity with the following command from the AP CLI. A lot of information will be displayed with this syntax. You are interested in the section that states "Certificate". You need to insure your WLC time is set within the APs validity time frame.

(Cisco Controller) >show crypto ca certificates

Certificate
  Status: Available

  Certificate Serial Number: 3BC24B9600000012211221
  Certificate Usage: General Purpose
  Issuer:
  cn=Cisco Manufacturing CA
  o=Cisco Systems

  Subject:
   Name: C1130-001c58734445
   ea=support@cisco.com
   cn=C1130-001c58734445
   o=Cisco Systems
    l=San Jose
   st=California
     c=US

  CRL Distribution Points:

    http://www.cisco.com/security/pki/crl/cmca.crl

  Validity Date:

    start date: 12:56:31 UTC Jun 30 2007
    end   date: 13:06:31 UTC Jun 30 2017
    Associated Trustpoints: Cisco_IOS_MIC_cert


Lets set the time on the WLC. You can set the time manually which is locally stored on the WLC or via NTP server.

(Cisco Controller) >config time ?

manual         Configures the system time.
ntp               Configures the Network Time Protocol.
timezone      Configures the system's timezone

Lets look at the manual config:

(Cisco Controller) >config time manual ?
(Cisco Controller) >config time manual <MM/DD/YY> <HH:MM:SS>
(Cisco Controller) >config time manual 12/21/09 23:30:00

Lets now look at the NTP config:

(Cisco Controller) >config time ntp ?
interval       Configures the Network Time Protocol Polling Interval.
server         Configures the Network Time Protocol Servers. 

<Interval> is the polling interval the WLC will sync with the NTP server - between 3600 and 604800 (in seconds).
<Server> is the NTP server ip address. You also can index the NTP servers. By this it means you can add multple servers.

(Cisco Controller) >config time ntp server <index> <ip address>
(Cisco Controller) >config time ntp server 1 192.168.1.1 

Note: If you want to delete your NTP entry use 0.0.0.0 as your IP address.

The last part of the config is to set the time zone

Sunday
Dec062009

WLC CLI Command To Change AP Duplex <auto/half/full> and Speed <auto/10/100/1000> <all/Cisco AP Name>

Here is another nugget to put in the bag and only can be done in the CLI of a WLC. Suppose you want to modify the duplex and speed of the ethernet side of an AP or all the APs for that matter. By default both the duplex and speed are set to auto.

This is how -- drop down into the CLI of the WLC. This command lives under the <ap> catagory. 
(Controller) config ap ethernet duplex <auto/half/full> speed <auto/10/100/1000> <all/Cisco AP Name>


Monday
Nov232009

WLC CLI command to change AP <Username> <Password> to ALL APs

The more you experiment and live in the CLI of a WLC you will find little nuggets that you can’t do in the GUI. This little find is just one of them. The AP USERNAME command allows you to change the username and password for ALL of the access points that are connected to the controller.Why is this important you might wonder? The obvious of course. Even if your AP is lightweight someone can still telnet, ssh or console into the AP with Cisco / Cisco.  

This command allows you to change ALL or individual APs usernames and passwords. This comes in handy after a new deployment.   

(Cisco Controller) config>ap <username> GEORGE <password> MY80211 <ALL or name of individual ap>

Friday
Nov202009

WiSM Auto-LAG Feature  

When installing WiSMs in the past I would do it the old fashion way. You know, create my 4 port channels (2 for management) (2 for the controllers), configure the 8 gig interfaces (these come up once the WiSM is installed), and assign these to the port channels.

Software release 12.2(18)SXF5(Sup 720) has a new WiSM feature call "auto-lag". I am always cautions with anything with the word "auto" when it comes to networking. However I was pleasantly surprised with the new feature.  So what is auto-lag --  auto-lag allows you to configure a controller with 3 simple commands rather then doing the multiple steps.

Lets walk through the steps of auto-lag. In this example we will configure a WiSM in MOD 3 controller 1. We will be have native vlan 100 and allow vlans 200,201,202 and 203. These are my wired interfaces which tie to SSIDs.


#> wism module 3 controller 1 native an 100 <--- This creates a native vlan. This is used for your controller management (untagged)

#>wism module 3 controller 1 allowed-vlan native 100, 200, 201,202,203 <--- This allows which vlans are allowed

#>wism module 3 controller 1 qos-trust dscp <--- Good ol' QoS


 This is the output of the show run with auto lag. Note you will not see the gig interfaces and the port channel in the show run output, as you would normally expect to. But don’t worry they are there.


#>show run

wism module 3 controller 1 allowed-vlan 100,200-203

wism module 3 controller 1 native-vlan 100

wism module 3 controller 1 qos-trust dscp


If you want to see the etherchannel you can

#>show etherchannel      

          Channel-group listing:

        -----------------------

 Group: 287

----------

Group state = L2

Ports: 4   Maxports = 8

Port-channels: 1 Max Port-channels = 1

Protocol:    -

Minimum Links: 0

Tuesday
Nov172009

Reset The WLC To Factory Default Settings Using The CLI

This week I am configuring (2) 6504's with 4 WiSMs for a brand new installation. We are deploying Cisco's new 1142 802.11n access points in a location grade deisgn. As part of the deployment and configuration I needed to restore one of the WiSMs back to factory default. I wanted to share with you the procedure and CLI commands. 

1. First, you need to reset the controller. Enter reset system at the command prompt. 

2. At the prompt that asks whether you need to save changes to the configuration, enter Y or N, doesn’t matter what you select. The controller will then reboot. 

3. When you are prompted for a username, enter recover-config to restore the factory default configuration.

 Press enter and the controller will reset back to factory default.

Thursday
Nov122009

Restore the backup image on your WLC

You just loaded that new code on your WLC and something blew up! Quickly you scramble to start looking through the manual or start downloading and reapplying the previous level of code.

Did you know the controller saves the previous version of code on the controller and all you have to do is change the boot image to active? When you upgrade the WLC with a new image , the WLC automatically writes the new image as the primary image and the previously existing primary image is written over the backup image.

Note: The previously existing backup image will be lost ! 

Below are snips of a backup in progress 

(Cisco Controller) >show boot

Primary Boot Image............................... 4.2.176.0 (active)

Backup Boot Image................................ 4.2.130.0


(Cisco Controller) config>boot ?

primary        Sets the primary image as active.

backup         Sets the backup image as active.


(Cisco Controller) config>boot backup


(Cisco Controller) >reset system

The system has unsaved changes.

Would you like to save them now? (y/N)


(Cisco Controller) >show boot

Primary Boot Image............................... 4.2.176.0

Backup Boot Image................................ 4.2.130.0 (active)

Monday
Nov092009

Enable / Disable LEDs on Cisco LWAPP APs

Working as a consultant for many years you see it and hear it all! I had a situation one time where we deployed a new Cisco WLC solution. I was asked by the management of the hospital if we could turn off the LEDs on the access points in the "crazy ward" as the access points caused a lot of extra attention.

This is real easy to accomplish. In fact you can disable all the AP LEDs or specific ones. If you choose to select specific access points you will need to know the name of the ap. First drop down into the Controller CLI.

'config ap led-state enable/disable <Cisco AP name | all>'


CLI disable specific access point LED named lab1131

(Cisco Controller) config>ap led-state disable lab1131


CLI disable all access points LEDs

(Cisco Controller) config>ap led-state disable all


Page 1 2