INTEL WIRELESS
Wired Stuff
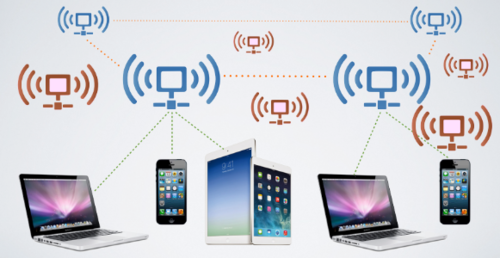
WiFi Tablet Corner
My80211 White Papers (Coming Soon!)

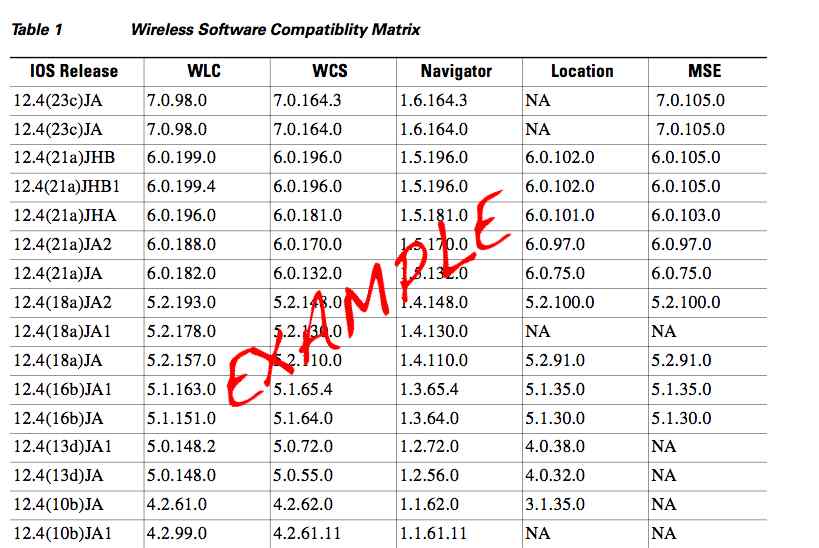
Cisco Wireless Compatibility Matrix (Nov. 2011)

Podcasts / Videos

My80211 Videos

Cisco: 802 11 frames with Cisco VIP George Stefanick

Fluke Networks: Minimize Wi Fi Network Downtime

Aruba: Packets never lie: An in-depth overview of 802.11 frames

ATM15 Ten Talk “Wifi drivers and devices”

Houston Methodist Innovates with Wireless Technology

Bruce Frederick Antennas (1/2)


Bruce Frederick dB,dBi,dBd (2/2)

Cisco AP Group Nugget

Social Links
Revolution WiFi Capacity Planner

Anchor / Office Extends Ports


Peek Inside Cisco's Gear

See inside Cisco's latest wireless gear!

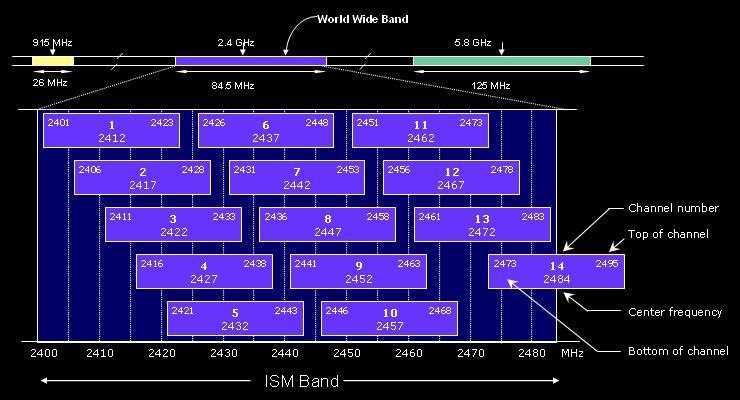
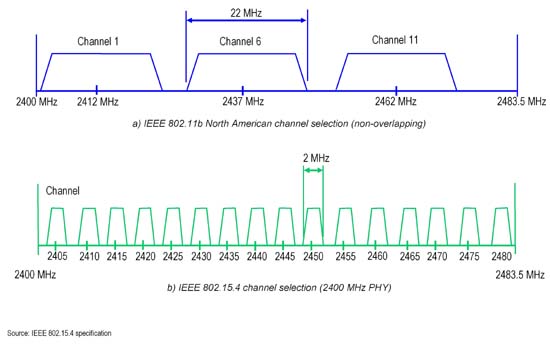
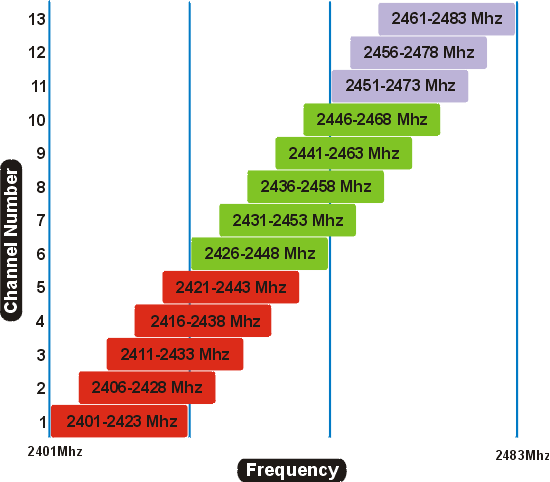
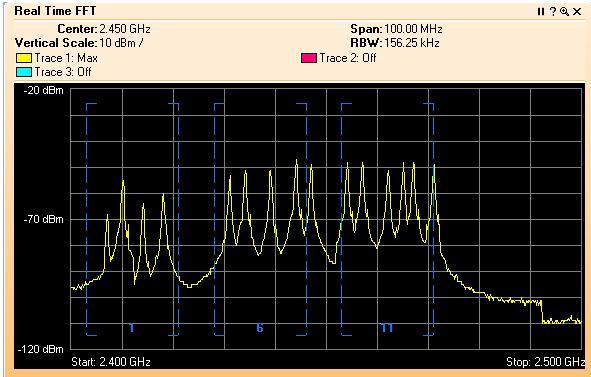
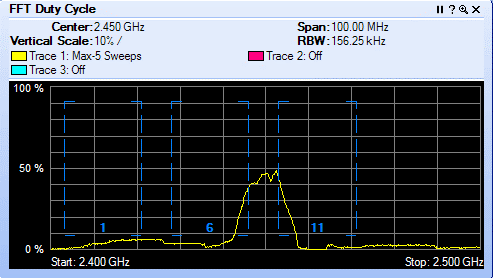
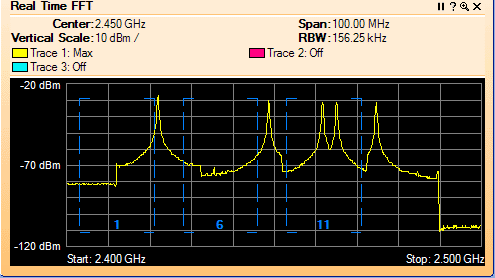
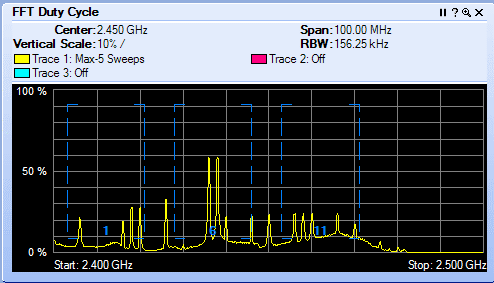
2.4 GHz Channel Overlap

EXAMPLE 1  

EXAMPLE 2

EXAMPLE 3  

CWSP RELEASE DATE 2/08/2010
  • CWSP Certified Wireless Security Professional Official Study Guide: Exam PW0-204
    CWSP Certified Wireless Security Professional Official Study Guide: Exam PW0-204
    by David D. Coleman, David A. Westcott, Bryan E. Harkins, Shawn M. Jackman

    Shawn Jackman (Jack) CWNE#54 is a personal friend and has been a mentor to me for many years.  I've had the pleasure and opportunity to work with Jack for 4 years. Jack is a great teacher who takes complex 802.11 standards and breaks them down so almost anyone can understand the concept at hand. I'm excited for you brother. Great job and job well done! Put another notch in the belt!

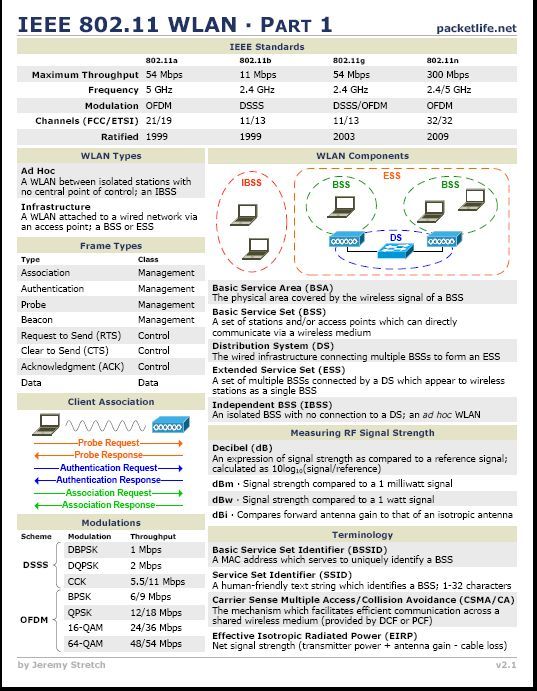
IEEE 802.11a/g/n Reference Sheet


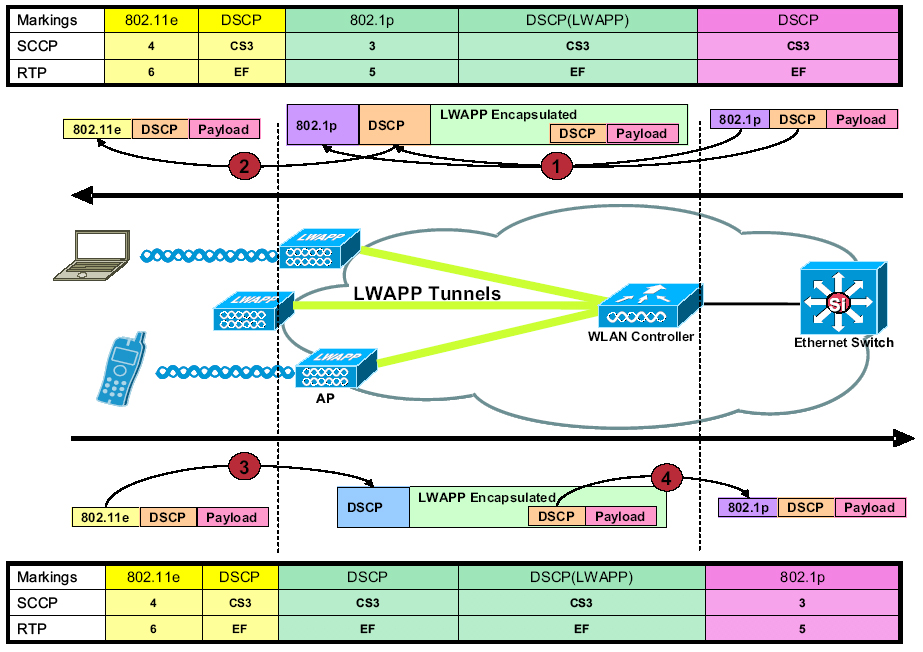
LWAPP QoS Packet Tagging


Interference Types

BLUETOOTH
 

Microwave Oven
 

Cordless Phone

JAMMER!
 

Tuesday
Feb162016

802.11 Packet Capture Skillz To Pay The Bills

Digging deep into the Stefanick archives of real world 802.11 issues. I challenge YOU with 4 real world examples. Keep in mind sometimes the obvious is not so obvious. While frames don’t lie understanding 802.11 is important to see the truth. 

These are real customer issues on real networks with real problems.

PROBLEM #1: 

Customer complained of slow WiFi performance in a specific part of the warehouse. It's always been slow said one worker. It's never really preformed right since it was installed. 

During my packet capture I observed a lot of frames with a similar “bit" being marked. What “bit" could be a clue that might contribute to a slow network ?


ANSWER #1

If you answered retry bit you would be right. The retry counter was above 30% for channel 6. While the noise reference on channel was within reason the packet capture was a "bit" misleading displaying a -92. No pun intended. I turned on WiSpy, low and behold layer 1 interference. There were old security cameras operating on 2.4 no longer in use but still powered. The cameras were causing interference across channels 1 - 6, causing high retry rates. 

WiSpy 


PROBLEM #2: 

After a recent firmware update a number of Cisco 7925 phones exhibited an odd behavior. They would connect to the wifi network and then disconnect and display Locating Network Services. This happen repeatable.

I open my sniffer and see frames much like this one. 

ANSWER #2

If you answered duration timer you would be correct. The duration value caught my attention during troubleshooting. In the end it was a firmware bug on the handset due to an interoperability with a specific configuration and 802.11n access points. Note when a client sends a duration value, clients who can demodulate this frame will use this value and reset their clocks to busy. This was impacting the entire cell and not just the phones. 


Read this blog post in its entirety:

Sunday
Feb072016

802.11 - Reason Codes and Status Codes

802.11 - Reason Codes and Status Codes 

The 802.11 standard section 8.4 comments on reason codes and status codes. I’ve used these myself when troubleshooting frame captures. These codes provide insight to Wi-Fi related problems like stations connecting and disconnecting. Lets dive in and see what the standard says about reason and status code fields. Then lets look at real world frame captures and see these codes at work.

802.11 Standard Overview

8.4.1.7 Reason Code field 

This Reason Code field is used to indicate the reason that an unsolicited notification management frame of type Disassociation, Deauthentication, DELTS, DELBA, DLS Teardown, or Mesh Peering Close was generated. It is contained in the Mesh Channel Switch Parameters element to indicate the reason for the channel switch. It is contained in the PERR element to indicate the reason for the path error. The length of the Reason Code field is 2 octets. The Reason Code field is illustrated in Figure 8-41. 

8.4.1.9 Status Code field 

The Status Code field is used in a response management frame to indicate the success or failure of a requested operation. The length of the Status Code field is 2 octets. The Status Code field is illustrated in Figure 8-43.

Reason Code Field 

When conducting frame captures you can find the reason code in some of the management frames like the response and disassociation frames. I like how the 802.11 standard comments:  “unsolicited notification”. 

It’s unsolicited information whereby radios can provide connection information. 

Example: Disassociation frame with reason code 1. This radio is informing the other radio it’s disassociating for unspecified reasons.


Read this blog post in its entirety here:

http://community.arubanetworks.com/t5/Technology-Blog/802-11-Reason-Codes-and-Status-Codes/ba-p/257893

Monday
Jan252016

802.11 - TIM and DTIM Information Elements  

In this blog post I investigate 802.11 TIM and DTIM.

Read the entire blog post here: 

http://community.arubanetworks.com/t5/Technology-Blog/802-11-TIM-and-DTIM-Information-Elements/ba-p/256997 

Traffic Indication Map (TIM) - 

After reviewing what the 802.11 standard says about TIM. Lets discuss in real world terms what a TIM is and how it works. 

You will specifically find TIM in a management frame called a beacon. A beacon is triggered by default on an access point every 102us. Think of a beacon as a network advertisement. The beacon advertises specific <BSSID> wireless network information such as supported PHY rates, security protocols, supported QoS/WMM, vendor specific information and much much more. Included in the beacon is a TIM information element. 

Example: BEACON WITH TIM

Delivery Traffic Indication Map (DTIM) - 

After reviewing what the 802.11 standard says about DTIM. Lets discuss in real world terms what a DTIM is and how it works. 

You will specifically find DTIM in a management frame called a beacon under the TIM information element. DTIM is to broadcast / multicast traffic as TIM is to unicast traffic.

Under the TIM you will see DTIM count and DTIM period. 

Example: DTIM COUNT / DTIM PERIOD 


Tuesday
Jan192016

802.11 - Action Frames

The 802.11 standard section 8.5 comments on action frames. Action frames are interesting. Action frames can be triggered by access points or client stations. The action frame provides information and direction as in what to do. The 802.11 standard comments about action frames in 17 different sections of subsection 8.5. While many of these aren't used by vendors today some important ones are. Lets review some comments about action frames and then head to the frame captures.

<continue.....>

Example: DFS event is under way. The access point is sending an action frame to the cell to announce a channel change.

Category - 0 Spectrum Management
Action - 4 Channel Switch Announcement
Element - New Channel 64


Example: In this example TSPEC. Where a client is requesting a TS <traffic stream>.

Category - 17 WNM
Action - 0 ADDTS Reuquest
Status Code: 0 Admission Accepted

 * Note I believe Omnipeek is decoding this wrong. I believe the category code should read WNM.

Click here for the entire blog post:
http://community.arubanetworks.com/t5/Technology-Blog/802-11-Action-Frames/ba-p/256811 

Monday
Oct242011

OmniPeek Remote Assistant (Cisco TAC)

Arron Leonard from Cisco TAC released a great post about ORA on CSC.

OmniPeek Remote Assistant

VERSION 4  Click to view document history

Omnipeek Remote Assistant (ORA)

Cisco TAC can provide the Omnipeek Remote Assistant application to assist in performing wireless packet captures. The tool will capture wireless packets and encrypt them for processing by the TAC. A full version of Omnipeek Enterprise is required to decrypt and analyze the capture files.


Installation

You should receive a ZIP file from TAC – such as “ora131Cisco.zip” (the filename may change with different release versions). Open this file and Navigate to the “OmniPeek Remote Assistant” folder – run the installer “ora131.exe” and follow the installation instructions.


Supported Wireless Adapters and Drivers

Capturing Wireless Packets with ORA requires the use of supported Wireless Network Adapters along with the appropriate driver version. To view a complete list of supported adapters and drivers, please see:


http://www.wildpackets.com/support/downloads/drivers


In most cases, the Ralink USB adapters will be the easiest to install - and, because you can install multiple USB adapters on a single laptop - they are the best way to get a multichannel capture.  The following Ralink adapters have been tested by Cisco TAC:


Linksys WUSB600N (V1 and V2), Linksys AE1000,ALFA AWUS051NH


Driver Installation for Linksys USB600N with Windows XP

1. TAC can provide the OmniPeek driver for the Ralink USB adapters.  You should receive a ZIP file “RALINKUSB-1_4_0_18.ZIP”. There will be 2 folders in the archive -- “Win2kXP” for 32-bit Windows and “WinXPx64” for 64-bit Windows. Extract the contents of the appropriate folder for your Operating System to a specified location.

image001.png


2. Insert the Linksys USB600N adapter.

a. If this is the first time using the adapter on the workstation, Windows  will start the New Hardware Wizard. Do not search for a driver  automatically and click Next. Skip to step 3.

b. If you have previously installed the Linksys USB600N on your  workstation, you will need to change the driver to the Omnipeek version.  Go to Start > Control Panel > Network Connections and Right Click  on the Linksys adapter and click Properties. In this example, the  interface is “Wireless Network Connection 3”.

image003.png

Under the General Tab, Click the “Configure…” button, and then click on the Driver Tab > Update Driver. This will prompt the Hardware Update Wizard.


3. Select “Install from a list or specific location (Advanced)” and click Next. Select “Search for the best driver in these locations.”, include the location of your extracted driver files and click Next:

image004.png

4. Windows will now search and install the Omnipeek driver. If you receive the following warning message, click “Continue Anyway”.

image006.png

5.  The driver installation should complete and the adapter is now ready for capturing packets with ORA.


Running Omnipeek Remote Assistant


If the correct driver isn’t loaded, ORA may appear to work, but not provide the option to select the desired channel to monitor. The Channel cell will read ‘Ethernet’ or ‘Wireless’ and not offer the option to select a channel:


image007.png


Capture Settings

Select the desired adapter(s) to perform the capture and indicate the desired channel. If you have multiple supported adapters installed you can capture on multiple channels simultaneously (but you cannot mix wired and wireless interfaces at the same time). You can select either an 802.11b/g channel or 802.11a channel in the dropdown. You can select 40 MHz 802.11n channels using the (n40l) or (n40h) options. The n40l will be the selected channel and adjacent lower channel, while n40h will be the selected channel and adjacent higher channel.

image008.png


File Properties

Select the folder you would like to store the capture files in. You can then also specify the file rollover size. Each new filename will include a timestamp so data will not be overwritten.


Capture Control

If you have selected correct adapter/channel settings, you will now be able to click the Start/Stop buttons at the bottom. You will not be able to see the packets, but you will see the counters incrementing. Click Stop when finished.


Uploading the files to TAC

If the capture file(s) are too large for email, you can upload them to your TAC Service Request:


https://tools.cisco.com/ServiceRequestTool/query/


Enter your SR Number, and then click on File Upload.